Instructions for Integration:
- Step 1: Start a campaign.
- Step 2: Integrate the tracking code on your website
- Step 3: Run the security integration validation test.
- Step 4: Test using an affiliate account
Step 1 – Start A Campaign
- Run the script using HTTPS protocol, if not, then it can affect the tracking
- Navigate to marketing>>campaigns>>create new


- Choose the “Click integration” tool type.
- Decide on a campaign name.
- Set the target link that you want to track; it might be either your main website or a particular page.
- Select a category. [Option]
- You will be assigned an auto-featured icon, which you can change to one of your choosing.
- You’ll have an automatic featured image that you may change to one of your own.
- Set “Number Of Clicks” to the number of clicks the affiliate must receive to receive the commission.
- Set the commission you want to pay per “number of click value” when setting the “Cost Per Click”
- Set “General code”; it must not contain any spaces or special characters because it is a powerful code that must be contained within the tracking code.
- Save the banner, finally.
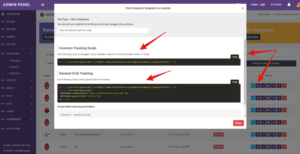
Step 2 – Integrate the tracking code on your site
To obtain the code for your target page, click the integration icon.
- Place a copy of the Common Tracking code in the header of your website or on the page where you want to track clicks.
- Place the general click tracking code in the header of your website or the page you want to track clicks on.
Step 3: Run the integration security tester to validate the integration.

Step 4 – Test using an affiliate account
Do a full test using an affiliate account and on a different browser w no admin and no affiliate are logins in.

Results on Admin wallet:
